
Surface finish matters—and when you need accurate roughness measurements on the go, you want a…
Surface finish measurement is one of the most important steps in ensuring part quality and consistency. Before you can begin taking measurements, it’s critical to properly qualify and calibrate your stylus — the small but essential diamond-tipped probe that captures the surface profile.
Here’s a step-by-step overview of how to correctly set up and verify your surface finish tester for accurate results.
Step 1: Qualify the Stylus
When setting up your surface finish tester, the first thing you should do is qualify your stylus. This ensures your measurements are accurate and traceable to a known reference.
To begin:
- Choose the Calibration command on the tester.
- Navigate to Stylus Calibration and select it.
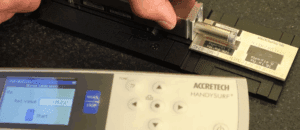
- The system will prompt you to confirm the reference value — in this example, 125.2 µin.
- Place your 125.2 calibration master beneath the stylus.
- Gently lower the stylus onto the master surface.
Be careful — the diamond stylus is delicate and can easily be damaged.
Once it’s in contact, press the blue Measure/Stop button. The stylus will move across the reference for the programmed trace distance (in this case, 0.150″). When the trace is complete, the tester will confirm that the calibration is valid.
Step 2: Handle the Stylus Carefully
When switching between parts, always lift the stylus away from the surface, not the other way around. Lifting the part instead of the stylus can scratch both the workpiece and the diamond tip — leading to inaccurate readings or damage.
Step 3: Perform a Stylus Check
After calibration, it’s good practice to run a stylus check to verify performance across different ranges.
Most roughness specimens include a stylus check patch — in this example, the second patch is rated at 16.1 µin.
To perform the check:
- Select Stylus Check from the menu.
- Confirm the preset reference value (here, 16.1 µin).
- Press Measure/Stop again to begin the trace.
When complete, the tester will display the actual measured value. A reading of 16.0 µin, for example, is well within tolerance and confirms that the stylus is calibrated correctly across both high and low ranges.
Step 4: Begin Part Measurements
Once your stylus has been qualified and verified, you’re ready to measure your actual parts with confidence. Proper calibration ensures repeatable, accurate readings — and helps you maintain tight control over your manufacturing processes.
Why Calibration Matters
- Ensures measurement accuracy and repeatability
- Prevents costly rework or rejected parts
- Protects delicate stylus tips from damage and wear
- Supports traceability for quality documentation and audits
Final Thoughts
Surface finish measurement may seem simple, but accuracy depends heavily on correct setup. By carefully qualifying and checking your stylus before each use, you’ll get reliable, consistent results every time.
If you’d like to learn more about surface finish testers, calibration procedures, or precision measurement tools, our team at Concept is here to help.