
Accurate measurements are the backbone of any manufacturing or quality control operation. But even the…
In this post, we break down what happens during a Coordinate Measuring Machine (CMM) calibration—including the standards technicians follow, how they evaluate measurements, and why proper calibration is critical for maintaining consistent accuracy in your quality process.
Why CMM Calibrations Matter
CMMs serve as precision tools for verifying dimensional accuracy in parts and assemblies. Over time, wear, environmental shifts, and electronic drift can introduce errors. That’s why you should schedule annual CMM calibrations—to keep your machine within tolerance and ensure it delivers reliable, traceable results.
WATCH VIDEO HERE TO SEE CMM CALIBRATION IN ACTION
Calibration Standards: ANSI B89 vs. ISO 10360
Technicians typically use one of two calibration standards:
ANSI B89: Some contractors still follow this older standard. In general, it uses a simpler method that typically involves a ball bar.
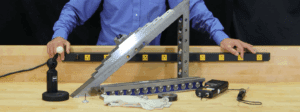
ISO 10360: On the other hand, most modern manufacturers prefer this comprehensive standard. It evaluates both one-dimensional lengths and full three-dimensional spatial accuracy using length masters, step gages, and other precision artifacts.
Key Components of ISO 10360 Calibration
1. Length Calibration
To start, technicians use certified step gages or gage blocks with known lengths (e.g., 100mm, 200mm, 300mm).
They:
-
- Probe reference artifacts in the X, Y, and Z axes.
- Compare actual readings to nominal values to identify deviations from ideal geometry.
- Move the gages across the machine volume—both inboard and outboard—to test at least 66% of the machine’s total volume.
2. Spatial Testing
Technicians test diagonally across the machine using step gages to:
- Verify combined movement accuracy in X, Y, and Z.
- Evaluate performance in all four corners of the machine to ensure spatial volume consistency.
3. THP Evaluation
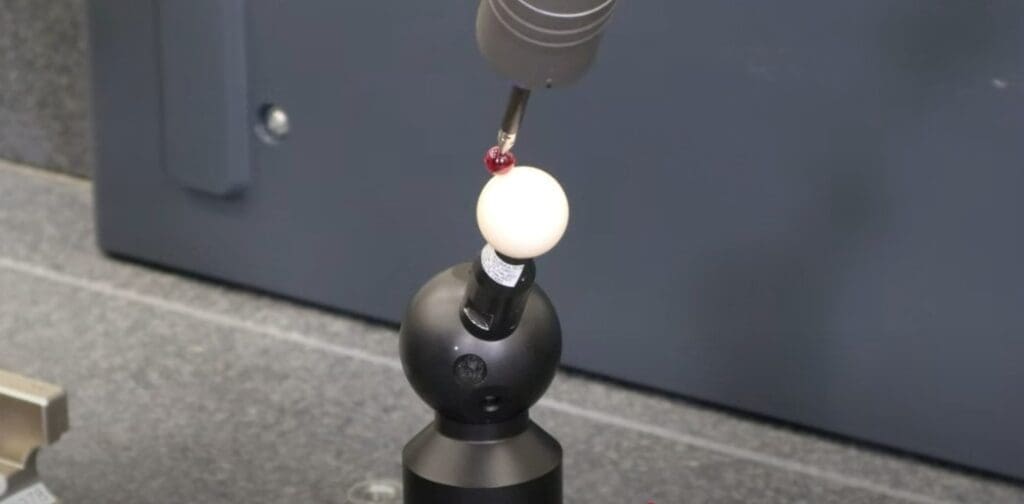
Then, technicians evaluate Touch Head Performance (THP) by:
- Scanning a calibration sphere in multiple directions and at varying speeds (e.g., 5 mm/s and 20 mm/s).
- Scanning ring gages in the XY, YZ, and ZX planes to identify squareness errors and detect electronic anomalies.
Best Practices for CMM Calibration
To maintain optimal accuracy, calibration professionals follow best practices to protect accuracy:
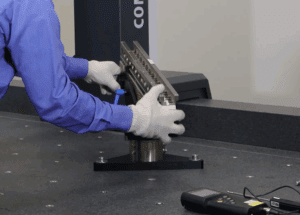
- They wear gloves and monitor temperature using a calibrated thermometer to maintain a stable environment.
- They arrive with multiple calibration artifacts and Pelican cases full of specialized setup tools.
How Long Does It Take to Complete a Full CMM Calibration?
Majority of technicians can complete a CMM calibration in 1-2 days. If you request preventative maintenance, expect 3-4 days.
Preventative Maintenance: Worth the Time
For best results, we strongly recommend pairing your calibration with annual preventative maintenance. During PM, a technician will:
- Tune CNC drives
- Adjust joysticks and scanning probe heads
- Fine-tune air bearings
- Inspect cables, harnesses, and voltage levels
Otherwise, skipping PM could cause mid-year failures or emergency service calls—both more disruptive and expensive than planned service.
Conclusion
When you follow the ISO 10360 standard, your CMM calibration ensures measurement accuracy and traceability. It’s not just a regulatory requirement—it’s essential to maintaining quality across your production line.
Plan ahead: Schedule both calibration and preventative maintenance annually to keep your equipment running at its best.